
Oracle 甲骨文ARM架构机器安装qbittorrent
编辑
388
2023-07-07

系统选择
本教程仅测试了Ubuntu/Debian系统
以下为系统DD脚本,仅供参考
Ubuntu20.04
bash <(wget --no-check-certificate -qO- 'https://moeclub.org/attachment/LinuxShell/InstallNET.sh') -u 20.04 -v 64 -a -firmware -p <这里输入你的密码> ##<>这两个符号要去掉Debian11
bash <(wget --no-check-certificate -qO- 'https://moeclub.org/attachment/LinuxShell/InstallNET.sh') -d 11 -v 64 -a -firmware -p <这里输入你的密码> ##<>这两个符号要去掉一.升级系统组件并开启BBR
如果安装上述脚本DD系统,系统缺少安装qbittorrent的必要组件所以要执行如下命令
apt-get update && apt install wget curl socat gnupg2 inetutils-ping lsof net-tools vnstat sudo vim -y完成以上步骤开启系统BBR
wget -N --no-check-certificate "https://raw.githubusercontent.com/chiakge/Linux-NetSpeed/master/tcp.sh" && chmod +x tcp.sh && ./tcp.sh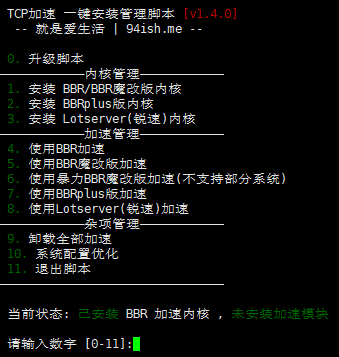 看到如上画面后按
4并回车提示BBR启动成功则说明开启成功
二.安装qbittorrent
完成以上步骤后执行如下命令
wget https://github.com/userdocs/qbittorrent-nox-static/releases/download/release-4.3.8_v1.2.14/aarch64-qbittorrent-nox && chmod +x aarch64-qbittorrent-nox下载完成后输入如下命令
vim /etc/systemd/system/qbittorrent-nox.service看到空白页面后按下键盘上的I并看到左下角提示Insert后讲以下内容复制进去
[Unit]
Description=qBittorrent-nox
After=network.target
[Service]
User=root
Type=forking
RemainAfterExit=yes
ExecStart=/root/aarch64-qbittorrent-nox -d --webui-port=自选端口号
[Install]
WantedBy=multi-user.target
然后执行如下执行,开启开机自启并启动qbittorrent
systemctl enable qbittorrent-nox&&systemctl start qbittorrent-nox三.调优qbittorrent
我这里提供一个我使用的qbittorrent配置仅供参考
(配置文件账号:adminn密码:231HqohZhWtv0xUzmr)vim /root/.config/qBittorrent/qBittorrent.conf- 0
-
分享